Arpeggios could be thought of as mini scales. Instead of laying out all the notes relevant to the key you’re playing in, arpeggios only include the notes of a chord. Put simply, when you are playing an arpeggio, you are simply playing through a chord note for note. Whether that be a major chord, minor chord or whatever chord you need to arpeggiate.
In this lesson, we will be taking a look at major and minor arpeggios and talking about how they can be used, and also how to work them out into shapes that suit your playing. As mentioned earlier, arpeggios are simply a collection of notes taken straight from a chord. That means that when looking at a major or minor arpeggio, we only have three notes in each. Below are diagrams showing you which notes are included in both a major arpeggio and a minor arpeggio:

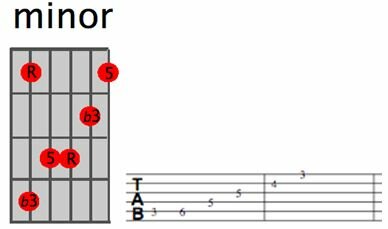
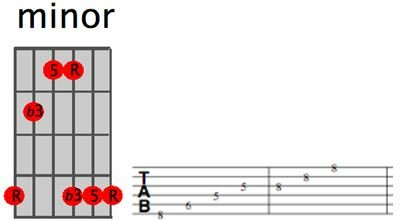
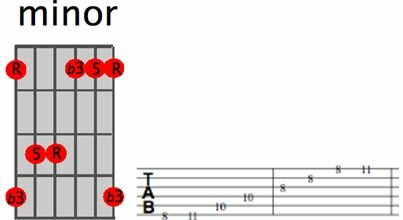
To put this into perspective, if we pick the key of C major, in the major arpeggio we have; C – E – G and for the minor arpeggio we have; C – Eb – G. To create a shape that runs across all six strings of the guitar we simply repeat the notes as we move across the strings. If this is done properly you should end up with a shape that takes in either five or six strings, with one or two notes on each.
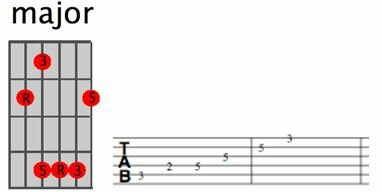
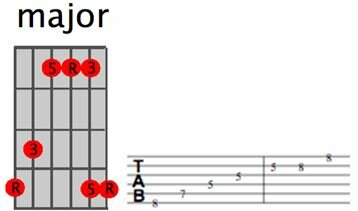
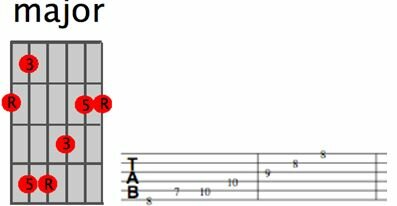
Below are three shapes for both major and minor arpeggios. The shapes have been written in TAB showing you how to play these shapes in the keys of C major and C minor:
RELATED Reading Guitar TAB Step 2: Exercises and Basic Tunes
C Major Arpeggio Positions:
C Minor Arpeggio Positions:
Arpeggios really come in handy when creating a riff or a melody that needs to change with the chord sequence. In much the same way as changing chords, you can change to the appropriate arpeggio each time a new chord comes along. In doing this you’ll get a fresh set of notes to choose from for each chord. Obviously, if you pick the correct arpeggio for the correct chord, you’re notes should also fit the new chord perfectly too.
Don’t be fooled into thinking that you have to stick to the shapes provided in this lesson. If you can work out what notes are included in what arpeggio, and you can find these notes laid out in a logical manner on the guitar, then there’s nothing to stop you working out your own shapes.
Below is an exercise designed to help you get used to changing arpeggios as the chord sequence changes from chord to chord. Attempt to play a fresh arpeggio for each new chord. For example, when the chord sequences changes from C to G; go from playing a C major arpeggio to a G major arpeggio and so on with each chord change. You can either create your own arpeggio shapes or transpose the shapes given. To transpose each arpeggio shape, simply match up the root notes from the patterns with the appropriate notes on the guitar. The TAB below the diagram gives an example of how this can be achieved:
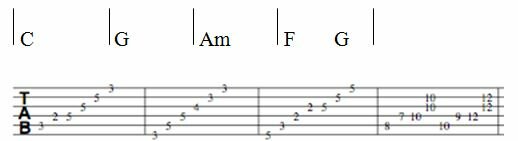
image credit – imagined reality